As NetXMS server keeps track of an IP topology, it is important to maintain the
configuration in which IP addresses do not overlap and that two IP addresses
from same subnet are really within one subnet. Sometimes, however, it is needed
to monitor multiple sites with overlapping IP address ranges. To correctly
handle such situation, zoning must be used. Zone in NetXMS is a group of IP
subnets which form non-overlapping IP address space. There is always zone 0
which contains subnets directly reachable by management server. For all other
zones server assumes that subnets within that zones are not reachable directly,
and proxy must be used.
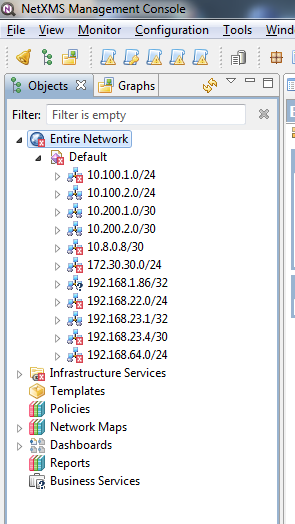
Zoning support is off by default. To turn it on you must set server’s
configuration variable EnableZoning to 1 and restart server. After
restart, server will create default zone with UIN (unique identification number)
0 and put all existing subnets into that zone. Subnet tree will looks like this:
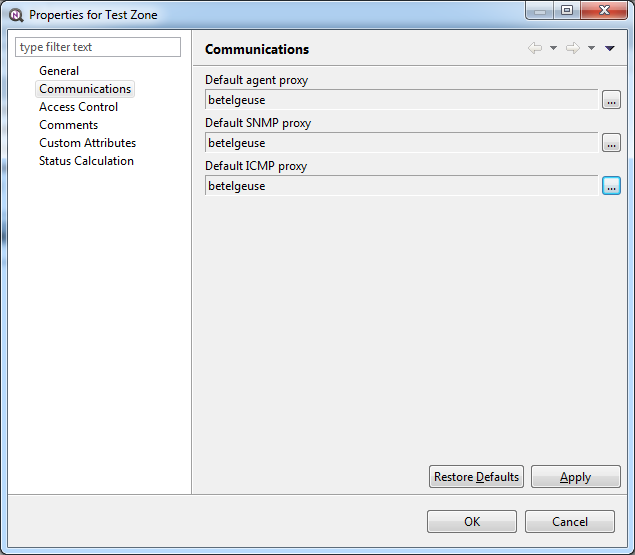
Server have to know proxy nodes to be able to communicate with nodes in remote
zones. Default proxy settings for all nodes in the zone can be set on
Communications page in zone object properties:
On this page you can set default proxy node for NetXMS agents, SNMP, and ICMP.
Note that proxy node must be in default zone and must have primary IP reachable
by NetXMS server.
To move existing node to another zone, select Change zone from
nodes context menu, then select target zone in zone selection dialog that will
appear. After move to another zone, server will immediately do configuration
poll on the node.
NetXMS provides possibility to create issues in external helpdesk system
directly from NetXMS management client, based on pending alarms. In this
situation NetXMS and external helpdesk system will have synchronized
issue workflow.
For NetXMS is required to configure server parameters
and restart the server.
Parameter name
Description
HelpDeskLink
For JIRA integration should be set to “jira.hdlink” (without quotes)
Jira.IssueType
Name of the JIRA issue type, which will be used by NetXMS.
Sample value: “Task” (without quotes)
Jira.Login
Login of the JIRA user(This user should exist in JIRA system with with
permissions to create issues in project(JiraProjectCode) and comment
on own issues)
Jira.Password
Password of the JIRA user
Jira.ProjectCode
Project Key in JIRA. (Project should exist)
Jira.ProjectComponent
Jira project component. (Project should exist)
Jira.ResolvedStatus
Comma separated list of issue status codes indicating that issue is resolved. Default is “Done”.
Jira.ServerURL
URL of JIRA installation. Example: “http://localhost:8080/jira”. Please note,
that trailing slash (“/”) should be removed!
Jira.Webhook.Path
Path part of Jira webhook URL (must start with /). Example: “/jira-webhook”.
Jira.Webhook.Port
Jira webhook listener port (0 to disable webhook). Default: “8008”.
Note
Starting from version 4.1.283 NetXMS version Webhook can be used for Jira to NetXMS integration. Not a jira plugin.
If all configuration was successfully done after rester in console should be present:
NetXMS JIRA plugin should be deployed to JIRA and configured. REST API should
be enabled in JIRA configuration (enabled in default configuration).
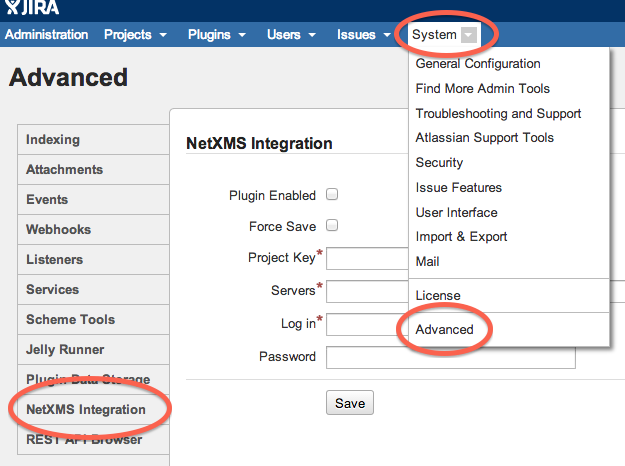
To access configuration page for the plugin, go to “System → Advanced” and select
“NetXMS Integration” tab:
Possible configuration options:
“Plugin Enabled” — global on/off switch, plugin completely cease any activity
when turned off (default).
“Force Save” — by default, plugin will verify configuration before saving
(connectivity to all servers, credentials). This checkbox allows to bypass
this step completely and save configuration even if one of more NetXMS
servers are rejecting provided credentials or do not respond at all)
“Project Key” — Key of the project, where issues from NetXMS will be created.
This key will be also used in workflow operations — plugin will process
events related to this project:
“Servers” — addresses of up to a 3 NetXMS servers, can be either
IP address or hostname.
“Log In” — user login in NetXMS (User should exist in NetXMS with Read, View
Alarms, Acknowledge Alarms, Terminate Alarms to all nodes)
“Password” — user password in NetXMS
Plugin will verify configuration and provide feedback. If one or more
NetXMS servers are not responding (e.g. they are not configured yet), you can
select “Force Save” to overrule verification process and save configuration.
Since JIRA workflow can be much more sophisticated than alarm states in NetXMS, JIRA
Administrator should decide which workflow transition should change NetXMS alarm
state.
NetXMS supports four alarm states:
Outstanding — initial state, can’t be set from JIRA side
Acknowledged — operator is aware of the problem and it’s in progress
(“Acknowledge” action)
Resolved — problem is resolved but alarm stays in the list until verified and
terminated by supervisor (“Resolve” action)
Terminated — problem is resolved and verified, alarm is removed from the list
(“Terminate” action)
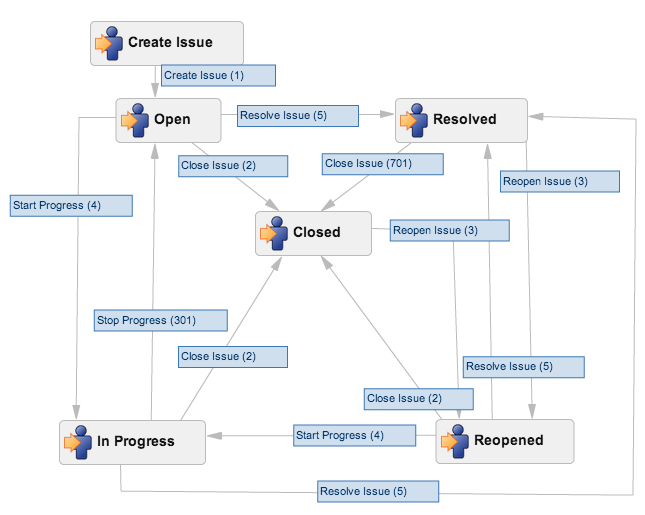
Sample workflow (JIRA default workflow):
Sample mapping:
Transition
NetXMS post-function action
Start Progress
Acknowledge
Resolve Issue
Resolve
Close Issue
Terminate
All other transitions
Ignored
Configure workflow in JIRA:
Create new Workflow Schema if required
Copy existing or create new Workflow
Assign Workflow to the project, where NetXMS will create issues
Modify transitions to call plugin’s post-function and change related alarm
in NetXMS
Click on a “cog” icon on a transition and select “View Post Functions”:
Click on “Add a new post function to the unconditional result of the
transition”:
Sometimes it is required to add some additional functionality after poll, object
creation or other action - for this purpose hooks were created. Hook is manually
created script in Script Library that is executed at a special
condition like end of the poll or interface creation.
More about poll types and purposes can be found there
and about script creation there.
To be recognized as a hook script should have special name. It should be named
according to convention: Hook::hook_name.
Example: Hook::ConfigurationPoll
Full list of hooks:
Hook name
Description
Parameters
Return value
Hook::StatusPoll
Hook that is executed at the end of status poll
$object - current object, one of ‘NetObj’ subclasses
$node - current object if it is ‘Node’ class
none
Hook::ConfigurationPoll
Hook that is executed at the end of configuration poll
$object - current object, one of ‘NetObj’ subclasses
$node - current object if it is ‘Node’ class
none
Hook::InstancePoll
Hook that is executed after instance discovery poll.
$object - current object, one of ‘NetObj’ subclasses
$node - current object if it is ‘Node’ class
none
Hook::TopologyPoll
Hook that is executed at the ens of topology poll
$node - current node, object of ‘Node’ type
none
Hook::CreateInterface
Hook that is executed after new interface is created.
$node - current node, object of ‘Node’ type
$1 - current interface, object of ‘Interface’ type
true/false - boolean - whether interface should be created
Hook::AcceptNewNode
This hook is executed by discovery process, after a new node is found and
it’s checked that no node with give IP address is present in the system
and before any network discovery filters.
$ipAddr - IP address of the node being processed
$ipNetMask - netmask of the node being processed
$macAddr - MAC address of the node being processed
$zoneUIN - zone UIN of the node being processed
true/false - boolean - whether node should be created
Hook::DiscoveryPoll
Hook that is executed at the end of discovery poll
$node - current node, object of ‘Node’ type
none
Hook::PostObjectCreate
Hook that is executed after object is created
$object - current object, one of ‘NetObj’ subclasses
$node - current object if it is ‘Node’ class
none
Hook::CreateSubnet
Hook that is executed on subnet creation
$node - current node, object of ‘Node’ class
$1 - current subnet, object of ‘Subnet’ class
true/false - boolean - whether subnet should be created
Hook::UpdateInterface
Hook that is executed at the end of interface update
$node - current node, object of ‘Node’ type
$interface - current interface, object of ‘Interface’ type
none
Hook::EventProcessor
Hook that is executed for each event prior to it’s processing by Event
Processing Policies.
$object - event source object, one of ‘NetObj’ subclasses
$node - event source object if it is ‘Node’ class
$event - event being processed (object of ‘Event’ class)
none
Hook::AlarmStateChange
Hook that is executed on alarm state change (alarm gets acknowledged,
resolved or terminated)
$alarm - alarm being processed (object of ‘Alarm’ class)
none
Hook::UnboundTunnelOpened
Hook that is executed when tunnel connection is established, but not
bound to a node.
$tunnel - incoming tunnel information (object of ‘Tunnel’ class)
none
Hook::BoundTunnelOpened
Hook that is executed when tunnel connection bound to a node is
established.
$node - node this tunnel was bound to (object of ‘Node’ class)
$tunnel - incoming tunnel information (object of ‘Tunnel’ class)
none
Hook::LDAPSynchronization
Hook executed for each LDAP record (user or group) during LDAP
synchronization.
$ldapObject - LDAP object being synchronized (object of ‘LDAPObject’
class)
true/false - boolean - whether processing of this LDAP record should
continue
Hook::Login
Hook executed prior to user login
$user - user object (object of ‘User’ class)
$session - session object (object of ‘ClientSession’ class)
true/false - boolean - whether login for this session should continue
Usually hooks are used for automatic actions that need to be done on node.
For example automatic remove change of expected state of interface depending
on some external parameters.
Server (“netxmsd”) should be stopped while performing password reset operation!
Passwords in NetXMS are stored in hashed, not-reversible way, so there
are no way to recover it, but it can be reset. Use following procedure to reset
password and unlock account:
stop netxmsd
run “nxdbmgr reset-system-account” to unlock “system” account and change it’s password to default (“netxms”).
start netxmsd
login as “system” using password “netxms”
In user manager change password for any admin user account
login as admin user and disable “system” user account
When running on Windows server is capable of creating crash dumps. To enable crash dump generation, add the following options to netxmsd.conf file:
CreateCrashDumps=yesDumpDirectory=path
DumpDirectory must point to directory writable by server process. After each crash server will create two files: info and mdmp. Info file contains basic information about crash, server version, and call stack of current thread. Mdmp file is a minidump which can be read and analyzed using debugger.
It is possible to force creation of crash dump. To do that you’ll need access
to server debug console. You can access it using nxadm tool or via
Tools ‣ Server Console menu in management client. Once in
server debug console, you can run command dump or raiseaccess. First
command works only on Windows and will produce process dump without stopping
it. Second command will cause access violation exception which will lead to
process crash and crash dump generation.
Access control on the device or firewall prevent connections from NetXMS
server
Device do not support System (.1.3.6.1.2.1.1) or Interfaces
(.1.3.6.1.2.1.2) MIBs, which are used to detect SNMP-capable devices. To
override OIDs used for detection, set node’s custom attribute
snmp.testoid to any OID supported by device.
When the server (netxmsd) or agent (nxagentd) stops responding, consumes
excessive CPU, or otherwise misbehaves, a thread dump showing the call stack of
every thread is often the fastest way to diagnose the problem. On UNIX-like
systems it is produced by the helper scripts capture_netxmsd_threads.sh
(server) and capture_nxagentd_threads.sh
(agent). Either gdb or dbx must be installed.
Note
The netxms-dbg package must be installed on the system so that the
backtraces contain meaningful symbol information.
Run the script as a user allowed to attach to the process (usually root):
./capture_netxmsd_threads.sh
The script attaches the debugger to the running process, writes the backtraces
of all threads to a timestamped file in /tmp, and detaches. The process is
not stopped and keeps running. The output file name is printed on the screen:
Saving output to /tmp/netxmsd-threads.12345.20260708-142530
Run the script three times in a row with a 20-30 second interval between runs,
so that the support team can compare the dumps and tell which threads are stuck
and which are progressing.
The script aborts if the process is not found, if several matching processes are
found, or if no debugger is available. When reporting a problem to
NetXMS support, attach the generated files together with the log.
On a new node creation is generated SYS_NODE_ADDED event. So any automatic
actions that should be done on a node can be done by creating EPP rule
on on this event, that will run script. In such way can be done node bind to
container, template auto apply and other automatic actions.
It is possible to connect management client (nxmc) or web management client to
server automatically without login dialog. This chapter describes additional
command line options and URL parameters for that.
Connect to server automatically without login dialog
dashboard=dashboard
Automatically open given dashboard after login (either dashboard object ID or name can be specified)
login=login
Set login name
password=password
Set password, default is empty
server=address
Set server name or IP address
For example, to connect web management console to server 10.0.0.2 as user guest with empty password and
open dashboard called “SystemOverview”, use URL
Management client has an option to filter objects by defined by user criteria. Filter can be access by Tools->Find Object.
Filter can be used in two different modes: filter and query.
Filter will search object using class filter, zone filter, IP range and search string that will be checked for each object in all it’s
text fields (name, comments, custom attributes, Location, etc.).
There can be written any script that will be executed on all objects and if stript returns true - object will be shown in the resulting
table. There can be used the same syntax as for Object Query Dashboard element, but variables will not be added as
additional columns for table in this case.
LEEF server module provides functionality to send audit log to IBM Security
QRadar. The Log Event Extended Format (LEEF) is a customized event format for
IBM Security QRadar. More about it can be found there.
LEEF server module should be enabled in server configuraiton file by adding
“Module=leef.nxm” line to netxmsd.conf file.
Additionally to module configuration “LEEF” section should be added with
required configurations.
Name
Description
Server
Server address
Port
Server port
EventCode
LEEF event code
RFC5424Timestamp
“No” if RFC5424 Timestamp format should not be used (default value is Yes)
Facility
Facility as facility in syslog
Severity
Severity as severity in syslog
Product
LEEF product field, by default will be “NetXMS”
ProductVersion
LEEF product version field, by default will be server version
Vendor
LEEF vendor field, default it “Raden Solutions”
Separator
LEEF separator character as a char or in numeric format: “xHH”, where HH
is hexdecimal digit
Additional fields can be configured in ExtraData sub section in the same
key=value format.
To customize housekeeper operations it’s possible to use custom scripts. Scripts
are executed in the end of housekeeping process. Due to security considerations
scrips are stored on server file system in <DataDirectory>/housekeeper
folder, where <DataDirectory> is path to server data directory (see
DataDirectory parameter in Server configuration file (netxmsd.conf) for more
information). Multiple scripts can be present in the mentioned folder.
Two types of scripts are supported:
SQL (files with .sql extension) - file containing SQL queries. SQL query
can take multiple lines, end of query is denoted with semicolon (;)
character
NXSL (files with .nxsl extension) - file contains NXSL script. In
addition to all standard NXSL functionality, SQLQuery() NXSL function
is supported, allowing SQL query execution to the database.
To implement custom deletion of DCI and Table DCI data built-in deletion of this
data can be disabled by setting server configuration parameter
Housekeeper.DisableCollectedDataCleanup.
To enable InfluxDB fanout driver, add PerfDataStorageDriver=influxdb to
netxmsd.conf file. Driver configuration is specified in [InfluxDB]
section.
Name
Description
Bucket
Bucket name.
EnableUnsignedType
Enable (true) or disable (false) unsigned data type. If disabled, values for DCIs with unsigned data types will be sent as signed type. Default: false.
Database
Database name. Default value is netxms.
Hostname
Hostname. Default is localhost.
MaxCacheWaitTime
Maximum time in ms before cache being flushed.
Default is 30000.
Password
Password.
Port
Network port number
Protocol
Options are: udp, api-v1 and api-v2. Default it udp.
QueueFlushThreshold
Cache will be flushed when reaching this size (in bytes). Default: 32768
Queues
Number of queues for parallel operation. Default: 1.
QueueSizeLimit
Upper limit on queue size in bytes. If queue reaches this size, data will
be dropped. Default: 4194304.
Token
Authentication token.
ValidateValues ( from 5.1.2 )
If true, driver will validate values according to DCI data type, and drop invalid values (invalid numbers, out-of-range values). Default: false
CorrectValues
If both ValidateValues and CorrectValues set to true, instead of dropping values that did not pass validation, correct values will be sent to InfluxDB instead. Unparsable numbers will be set to last parsable part (for example, 123abc will be sent as 123), out-of-range values will be sent as maximal or minimal possible value. Default: false
Field key is made from DCI’s metric name (except for SNMP and internal “Dummy”
DCIs where description is used). Space characters are removed, :-.,#
characters are replaced with _, \ is replaced with /.
Empty DCI values are not sent.
If custom attribute named ignore_influxdb (with any value) exists on a node,
this node will be excluded from export. Also, if a DCI has Related Object set to
an interface and this interface has ignore_influxdb custom attribute, this
DCI will be ignored.
If there is custom attribute on the node or on related object with name starting
with tag_, it’s name (excluding tag_ part) and value will be used as tag.
There can be several such custom attributes.
To enable ClickHouse fanout driver, add PerfDataStorageDriver=clickhouse to
netxmsd.conf file. Driver configuration is specified in [ClickHouse]
section. The driver uses ClickHouse HTTP API to send data in RowBinary format.
The driver distributes incoming metrics across multiple independent sender
threads in a round-robin fashion (based on DCI ID). Each sender thread
maintains its own queue and sends data to ClickHouse independently.
Name
Description
Queues
Number of parallel sender threads. Valid range: 1-32. Default: 1.
QueueFlushThreshold
Number of messages to accumulate before flushing to ClickHouse.
Default: 1000.
MaxCacheWaitTime
Maximum time in milliseconds before flushing partial queue.
Default: 30000.
QueueSizeLimit
Maximum number of messages in a single queue. Messages exceeding this
limit are dropped. Default: 10000.
If set to true, metrics with string data type are not sent to
ClickHouse. Default: true.
EnableUnsignedType
Enable unsigned integer types for unsigned data. If disabled, unsigned
values are sent as signed. Default: true.
ValidateValues
If set to true, driver will validate values according to DCI data
type, and drop invalid values (invalid numbers, out-of-range values).
Default: false.
CorrectValues
If both ValidateValues and CorrectValues are set to true, instead of
dropping values that did not pass validation, corrected values will be
sent. Unparsable numbers will be set to last parsable part (for example,
123abc will be sent as 123), out-of-range values will be sent as
maximum or minimum possible value. Default: false.
UseTemplateAttributes
Extract tags and column values from template object custom attributes in
addition to host and related object attributes. Default: true.
Column names in the target ClickHouse table can be customized. Setting a column
name to none disables that column (except for the three mandatory columns:
timestamp, host, and name).
Parameter
ClickHouse type
Default column name
Column.Timestamp
DateTime
timestamp
Column.Host
String
host
Column.Name
String
name
Column.IntValue
Int64
ivalue
Column.FloatValue
Float64
fvalue
Column.Instance
String
instance
Column.DataType
String
data_type
Column.DataSource
String
data_source
Column.DeltaType
String
delta_type
Column.Tags
Map(String, String)
tags
User-defined columns can be added using Column.AdditionalData parameter.
Each value specifies a column name and ClickHouse data type separated by a
colon. Up to 16 additional columns can be defined. Supported data types are:
Int8, Int16, Int32, Int64, UInt8, UInt16, UInt32, UInt64, Float32, Float64, and
String.
Metric name is taken from DCI’s metric name, except for SNMP, Modbus, and
internal “Dummy” DCIs where description is used instead.
Empty DCI values and string values (when IgnoreStringMetrics is true)
are not sent.
Tags and custom columns from custom attributes
Tags and column values are extracted from custom attributes on the following
objects (in order of precedence):
Template object (if UseTemplateAttributes is true)
Host (node) object
Related object (if specified in DCI)
Custom attributes with names starting with tag: or tag_ are added as
tags (the prefix is stripped). Custom attributes with names starting with
column: populate the corresponding user-defined column.
If a custom attribute named pds:ignore or ch:ignore (with any value)
exists on any of these objects, the metric will not be sent.
Internal metrics
The driver provides the following internal metrics for monitoring via
PerfDataStorageDriver.clickhouse() parameter:
Metric
Description
senders
Number of active sender threads.
overflowQueues
Number of queues currently at capacity.
messageDrops
Total number of messages dropped due to full queues.
queueSize
Total number of messages currently queued across all senders.